
Heatmaps are a powerful tool for understanding how users interact with your website. By visually representing user behavior, heatmaps reveal critical insights about where visitors are engaging, where they drop off, and how they navigate through your site. Whether you want to optimize the placement of key elements, improve user experience, or boost conversion rates, effectively using heatmap data can be a game-changer.
We’ll explore different types of heatmaps and show you how to leverage the insights they provide to make informed decisions that drive better results for your website.
Heat maps provide insights into how visitors engage with your website by showing where they scroll, stop, and interact. Analyzing these patterns allows you to identify high or low user engagement areas. You’ll see that the highest engagement areas are marked in red while the lowest engagement areas are marked in blue.
Microsoft Clarity categorizes heatmaps into four different types:
- Scroll
- Click
- Area
- Conversion
It’s important to note that Conversion heatmaps are only available on Shopify websites.
With these heatmaps, you can use filters, compare heatmaps for the same page on different dates, and use Copilot to receive AI-generated summaries of them. You’ll receive insights into user behavior patterns and suggestions based on these.
Heatmap insights can guide you in strategically placing elements on a page to enhance visibility, boost user engagement, and improve conversion rates. Let’s get into each type and how we can put this data to use.
Scroll heatmaps
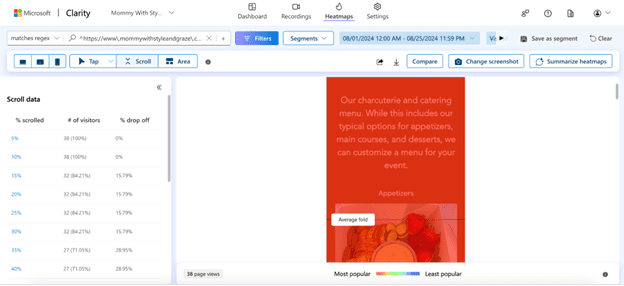
Scroll heatmaps show you how far down a user scrolls on a page. You’ll see the average fold, or what loads on a page before they scroll. You’ll also be able to look at the percent scrolled, the number of visitors that visited that part of the page, and the percent drop off per section.
Using Scroll heatmaps to improve user engagement
Plenty of websites overlook the importance of the space above the fold. This is the area where you should be placing your most important content. The scroll heatmap on Clarity will show you exactly where that is and the drop-off of users once they load the page.
Often, websites use a hero image that’s way too big and has nothing but an H1 and an image when a user first loads the page. This isn’t helpful and can deter people away from that page and even the site as a whole.
It’s best to place the page’s most important content loads above the fold, whether that’s a paragraph, form, call-to-action button, etc. Use that space to give users what they are looking for and if possible, direct them to the next place they want to go.
You can also use the percent scrolled data to find out what content users are not reaching on a page. If most users aren’t reaching something you believe they will find useful, then experiment with changing the layout of the content.
Click heatmaps
Click heatmaps show you elements on a page with high engagement. Elements that users are constantly clicking on will show up in red, while lesser clicked elements will be blue. When you look at this section, you can toggle between the following click data:
- All clicks
- Dead clicks
- Rage clicks
- Error clicks
- First clicks
- Last clicks
This information is crucial to seeing which parts of a page draw user attention the most. You can use this to lead them to other pages on the site, to fill out a form, give you a call, etc.
Using Click heatmaps to improve user engagement
Use your click heatmap data to find the following:
- Broken links
- Elements that look clickable, but aren’t
- Most clicked elements on the page
- Least clicked elements on the page
We recommend using the dead clicks and rage clicks data to find out which parts of a page or text users think should lead to some desired action but don’t. For example, in my case study of a home building client, I found out that users who visited the floorplans page clicked on the individual floorplans titles and expected to be directed to a page specific to that floorplan.
The basic information for each floorplan was on that page, but users wanted more information. Seeing this data led my team to create individual floorplans and we received way fewer dead clicks on the general floorplans page after that. This helped us continue to lead our users down the funnel and give them the information they needed to decide whether they wanted to contact our client.
Below, is a click heatmap example from a charcuterie and catering business.
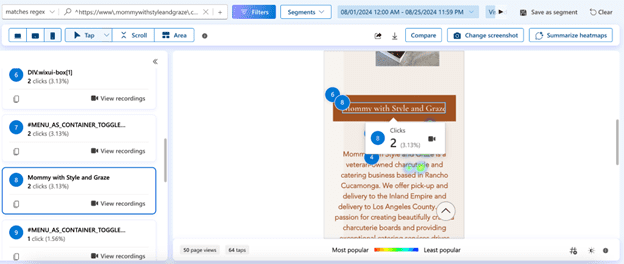
You can see that there were 2 clicks on the company’s name during the month of August. This is a small business site with not a lot of visitors, so the 5th-8th most clicked elements on the page all have 2 clicks.
Since users are scrolling down to this part of the page and a couple of them ended up clicking on the name, we might want to test placing a different element here. It might be best to try placing a call-to-action button that leads to the catering business’s menu instead and seeing how well that does.
Use your click data to run A/B tests and find out what hypotheses improve user behavior metrics.
Area heatmaps
Area heatmaps show you the total clicks in any given area on a page or groups of pages. This is similar to click heatmap data, but instead, you will receive a click-through rate (CTR) per area and can see the data for all elements within that area.

Using Area heatmaps to improve user experience
This type of heatmap is incredibly useful in narrowing down your focus to specific sections on a page. Let’s say there is a CTA section on a service page that includes a call button, a contact form button, and a link to the business’s address. You can view the CTR for the entire section and then narrow it down to those specific elements to see which CTA is the most popular.
You then may want to test changing the order of the CTAs and see if that has an impact on which one is the most effective. Or if you want to receive more phone calls vs form submissions, you might want to remove the contact form button from the area and place it elsewhere.
Conversion heatmaps
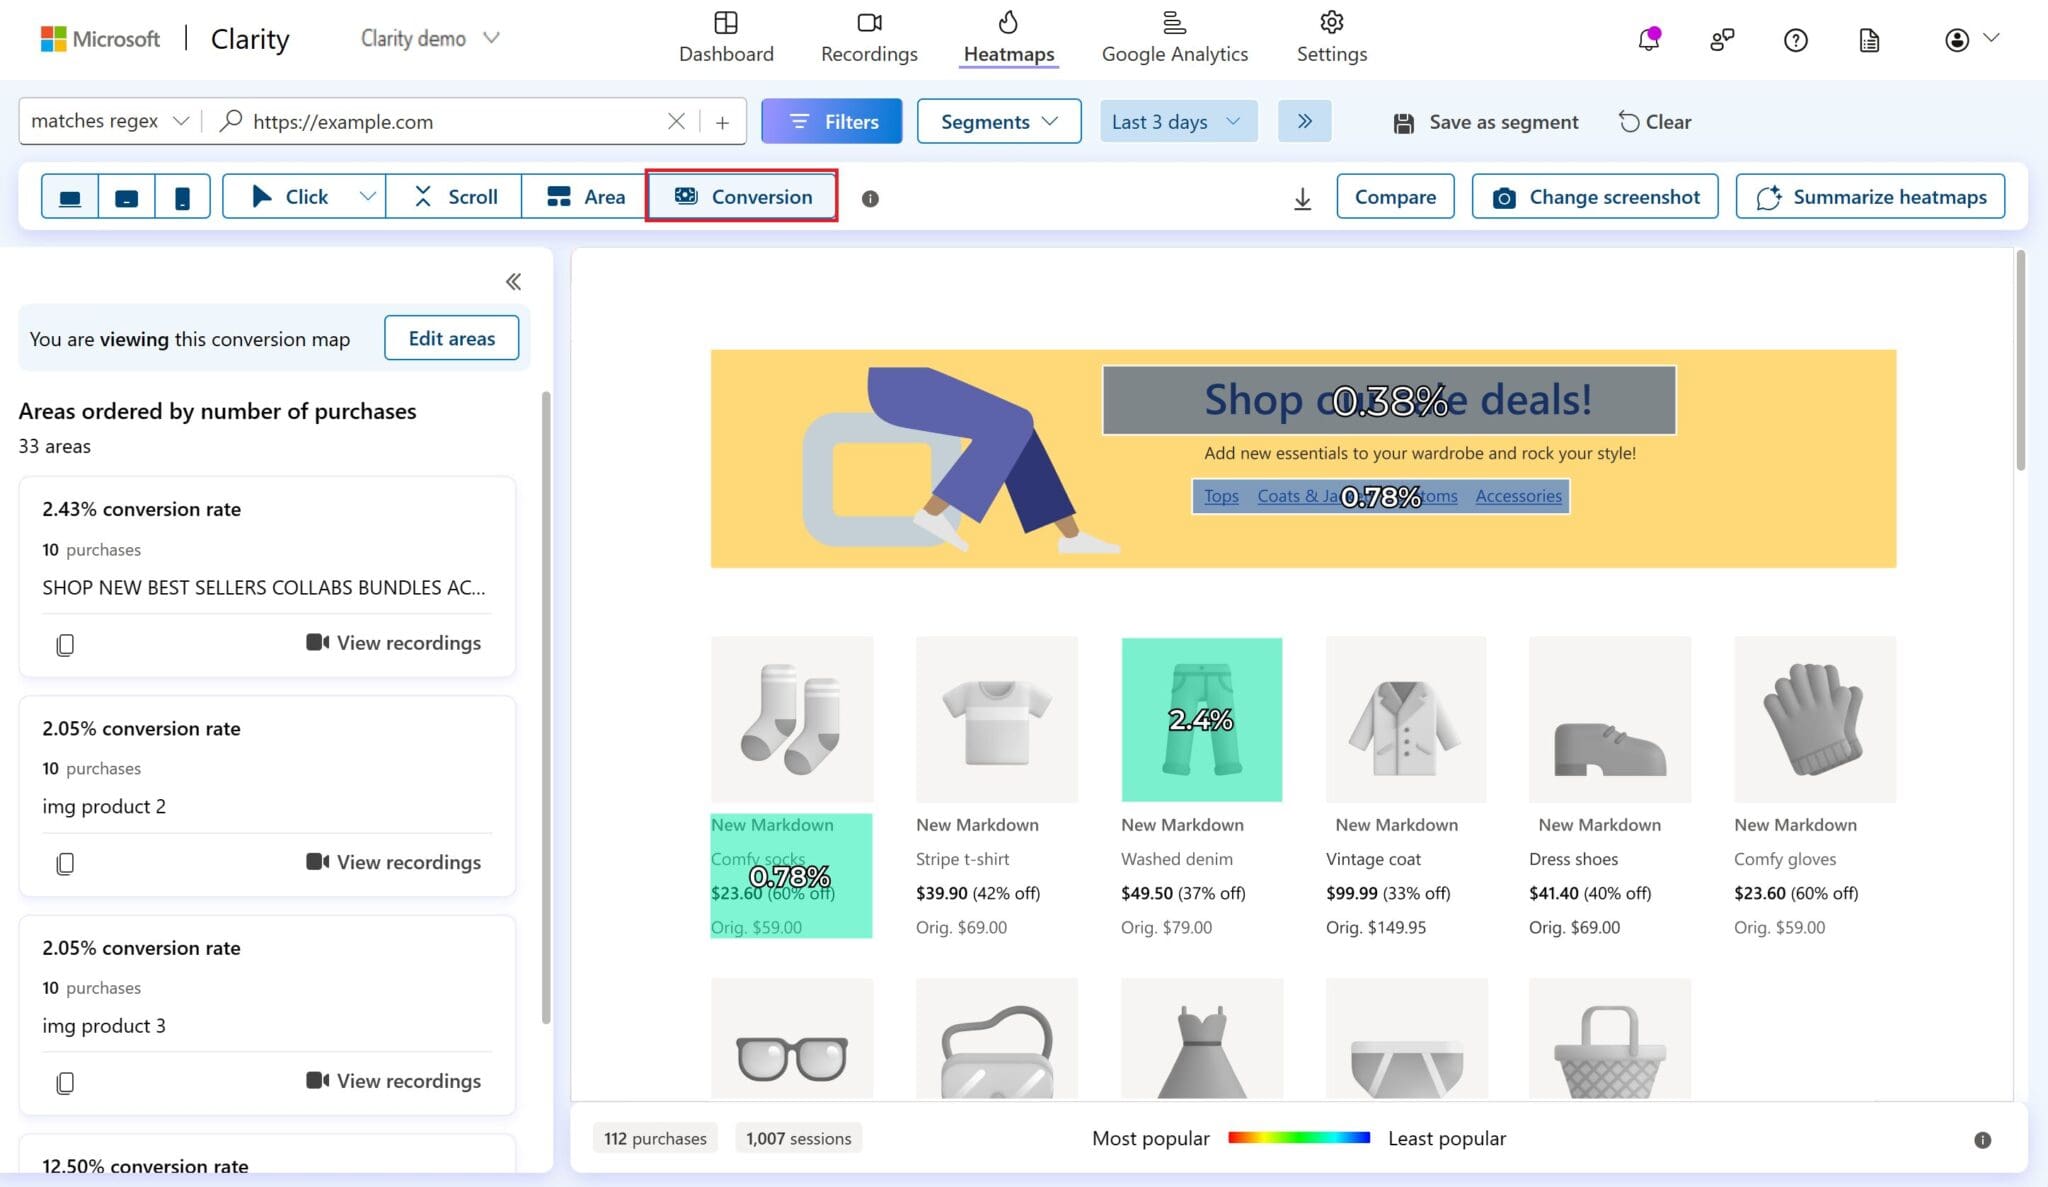
This heatmap exclusive to Shopify sites, shows the percentage of sessions that led to a purchase when a user clicks within a selected area. It’s important to know which pieces of content and widgets lead users to make a purchase, and with these heatmaps, you can now know where to focus your efforts.
Using Conversion heatmaps to improve conversion rates
Check out this data on your collection pages and see which products are driving the most conversions and which ones are driving the least. You can try testing new images for the lesser-clicked products or test the placement of certain products on a page to see if that impacts conversion rates.
Turning Insights into Action
Heatmap data empowers you to make data-driven decisions that align with your goals.
By analyzing scroll, click, area, and conversion heatmaps, you can optimize your site to enhance user engagement, improve navigation, and ultimately increase conversion rates. Start using these insights today to lead to a more effective and user-friendly website.
Celeste Gonzalez started her SEO career while blogging about her journey as a first-generation college student at U.C. Davis. After completing her Bachelor of Science in Managerial Economics, she joined RicketyRoo as an SEO Specialist. After a brief but impactful eight-month tenure as an SEO Specialist, Celeste quickly ascended to the role of SEO Strategist, where she shaped innovative strategies for nearly two years. Celeste now spearheads RooLabs, the cutting-edge SEO testing division at RicketyRoo, where she actively engages with the SEO community by sharing her experiences—highlighting achievements and challenges.