
The goal of this article is to create an Employees database
in SQL Server and populate it with test data in three quick steps. No theory
or lengthy technical explanations are given. Just concise instruction for
those that want to quickly see what SQL Server is. If you are familiar with
Access, MySQL, Oracle, or some other data store application, then this article
can serve as the “Hello World” sample application for you. Two different
methods can be used to manage SQL Server, the GUI (Graphical User Interface),
and the command line. Both will be covered starting with the GUI version. This
article assumes SQL is already installed.
A “Database” in SQL Server is a container that holds a group
of related objects. In addition to storing the actual data, a Database also
stores the structure of how that data is saved (called a Table), and any
related helper objects such a Queries (saved ways to look data up). To begin, we’ll
create a Database using the graphical interface called the “SQL Server
Management Studio”.
From the Windows Start Menu, select “Microsoft SQL Server”,
and then “SQL Server Management Studio”. Once the Management Studio starts,
right click the Databases folder and select new Database. Enter a name in the
“Database name” text box. For this example, well use the name “Test”.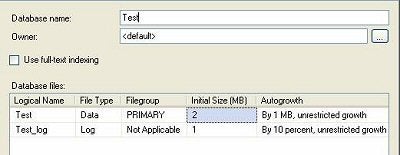
As you the type the database name in, the Logical Name for
the file types Data and Log will automatically fill in as well. The “Data”
file is where the actual data is saved on the hard drive. The “Log” file keeps
track of any changes to that data. Click OK.
Now that the Database is created, a structure to hold the
actual data is needed. This structure is called a Table. Think of Tables as
containing Columns and Rows, like a spreadsheet.
To create a Table, expand the Databases folder, and then
expand the newly created “Test” database.
Right click “Tables” and select “New Table”. You will be
prompted to fill in “Column Name” and “Data Type”. Fill in “EmpName” with a
data type of “varchar(50)”. In the next row, enter a Column Name of Wage with
a data type of “money”.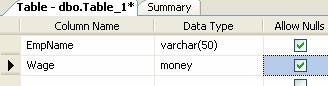
Unlike Excel or a spreadsheet, a column in a Database must
know ahead of time what type of data it will be storing. A data type of VarChar(50)
tells SQL Server to expect character data (text), of a variable size not to
exceed 50 characters. While you can enter numbers into a VarChar field, they
could not be added nor have math functions done against them. For math to be
allowed on a column, it must be some type of numeric field, which is why a data
type of “money” was used for the Wage column.
Save the Table by clicking the Save icon from the top menu
bar; the icon is shown below.
It will prompt for table name, enter “Employees” and click
OK.
To enter data into the newly created Employees table, expand
the Tables folder from the left menu as shown below.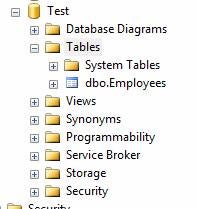
The newly created Employees table will be listed. Right
click it and select “Open Table”. A small grid will open. Enter a few data
lines as shown below. Moving to a new line after entering data automatically
saves.
In three steps using the SQL Server Management Studio, we
created a Database, a Table, and entered data. The same three steps are now
shown below using the command line (Query Window). To open a Query Window,
select “New Query” from the top left menu in the SQL Server Management Studio
as shown below.
A dialog box will pop up asking what server to connect to.
Enter your server name and then click connect. A drop down box above the new
window determines which database you are working with. Leave the default of
“master”. This is SQL Server’s main system database.
When working with a command or query window, the language
used by SQL Server is TSQL.
Create a new database called Test2 by entering the following
TSQL then pressing the “Execute” button on the top menu.
The Messages window on the bottom of the screen
should say, ”Command(s) completed successfully.”
Delete that line of TSQL and enter: USE Test2; . Again press execute. This tells the Query window to
run any future commands against they newly created Test2 database rather than
against master.
Next, we’ll create an Employees table to hold data. Delete
any TSQL in the Query window and execute the following:
 CREATE TABLE Employees
 (
  EmpName varchar(50),
  Wage money
 );
Execute the following statement to
enter data into the newly created table.
 INSERT INTO Employees
  (EmpName, Wage)
 VALUES
  (‘Tom’, 10.5);
INSERT INTO Employees
  (EmpName, Wage)
 VALUES
  (‘Jane’, 11);
INSERT INTO Employees
  (EmpName, Wage)
 VALUES
  (‘Mike’, 50);
The final step is to view
the data just entered. Remove the previos INSERT statements and exeucte the
following TSQL.
 SELECT *
 FROM Employees;
As shown below, all the
newly added records will be displayed.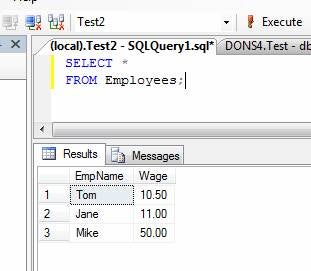
In this article we used both the
Grafical User Interface and TSQL command to create a new Database and a new
Table. Values were inserted into the new table and then retreived. If your
SQL Server was installed using defaults, then our examples just created are stored
on your harddrive under c:program files Microsoft SQL Server MSSQL Data.
There should be a Test. mdf (the actual data), and Test.ldf (a transaction log
of the changes we made to test). These files are binary specific to SQL Server
and cannot be used by Notepad, Word, Excel, or someother appliction.
»
See All Articles by Columnist Don Schlichting
Subscribe to Cloud Insider for top news, trends & analysis
DatabaseJournal.com publishes relevant, up-to-date and pragmatic articles on the use of database hardware and management tools and serves as a forum for professional knowledge about proprietary, open source and cloud-based databases--foundational technology for all IT systems. We publish insightful articles about new products, best practices and trends; readers help each other out on various database questions and problems. Database management systems (DBMS) and database security processes are also key areas of focus at DatabaseJournal.com.
Advertise with TechnologyAdvice on Database Journal and our other IT-focused platforms.
Property of TechnologyAdvice.
© 2022 TechnologyAdvice. All Rights Reserved
Advertiser Disclosure: Some of the products that appear on this site are from companies from which TechnologyAdvice receives compensation. This compensation may impact how and where products appear on this site including, for example, the order in which they appear. TechnologyAdvice does not include all companies or all types of products available in the marketplace.